Ford Automobiles Forum banner
401 - 419 of 419 Posts
As I said above, getting my ducks in a row for doing the job.

If I follow the guide and lower the engine, does doing so make the hole in the tensioner to both remove and install the belt, easily accessible?

As I will also be replacing the cam shaft oil seal, the single bolt / rotate the pulley is an alternative method but would prefer to have the pulley fully attached before tensioning the belt.
 
Hi Rex! You don't t need to raise or lower the engine to detension the belt if you've got the tool.
 
Thanks but don't have THE tool. Ground down a bolt so have the hex and 1/2" fitting that I can fit to a ring spanner but doubt that my spanner will be long enough to get the required leverage. Also, getting that small part to stay in the spanner while I fiddle around to get it into the tensioner....

Also, will be changing the three pulleys so I think lowering is the only way to get access to them. Which brings back my question, does lowering the engine give easy access to the tensioning square hole in the tensioner?

I am happy to tension with the crank pulley / singel bolt method but uncertain what happens if I undo and remove two of the bolts as the tension is suddenly released? My plan is to release all three bolts, remove one and hold the pulley tightly while removing the second, them slowly release the tension. But I can see that could be a good way to loose some skin.
 
I've only done this job once. Using the tensioner tool made this part of the job a doddle. £20-ish for the tool isn't a huge amount in the TCO of a Mk3 Mondeo.

I know there are other ways to do it that don't need the tensioner tool and may even be easier, if you're confident with what you're doing. Or, if you'd decided to have a go at the job on the drive one weekend, and then realise you don't have this special tool, then fair enough. But as you're planning this like a military operation anyway, why make life difficult? :)
 
Not quite a military operation, just like to be clued-up on what potential problems I may encounter. Main reason is, we only have one car and if things go AWOL, then I don't have the means to drive somewhere to get the necessary parts. Also don't have a motorbike, bicycle, e-scooter or horse, so kinda 'screwed' when it goes wrong!
 
As far as I can recall, You'll need to raise the engine to access the top idler. Don't make life difficult for yourself.... buy the tool. I really can't condone that other method mentioned as safe and good workshop practise.
 
Since I have had to replace the alternator, I also replaced the aux drive belt, pulleys and crankshaft oil seal. The Wiki was most useful but I found a few other things that if I had thought about them at the time, would make life a little easier.

I did not, but removing the fuel filter would make it easier to get your hand to the top of the alternator and see what you are doing. It is possible without removing it, but challenging to get the socket onto the nut when you cannot see it!

My little nut thing to release the tension sis not work as there is such limited space, and when I used a second spanner to increase the leverage, the little nut thing just popped out. As I was replacing the oil seal, I had to remove the crank pulley and the release the belt tension. To replace, I did the one bolt and hand spin the pulley to align the other bolts. Surprised how incredible easy it was.

I was replacing the alternator, so had to remove it via the wheel arch. To do so, create more space by releasing the tie rod and drop link. With the engine lowered, no problems. I did remove the air intake before removing but managed to replace with the cowling installed.

But..........

Removing the alternator from the lower studs was not possible with the studs in place. Remove them first before removing the alternator top bolt. To replace, it took me much too long balancing the alternator so that I could get the studs installed. A few degrees off straight and they will not grab the thread. If I had thought about it, installing the top bolt first would ensure that everything was straight for the lower two studs and support the weight of the alternator.

As an aside, I found that I have a 'spare' threaded hole next to the alternator top bolt. Don't know what I left off but see the same in one of the photos from the first post.

Image
 
To replace, I did the one bolt and hand spin the pulley to align the other bolts. Surprised how incredible easy it was.
Ive said this so many times on here, the laser tool is a joke, the tension its under to get the tensioner to release the belt is dangerous, doing it the way you did it is so easy its unreal.
 
just thought i write a How to Replace the
TDCI Aux Belt Tensioner
The kit that i got was made by gates and cost me the total of £105 inc vat part number is k036PK1640 and was purchest from Unitpart
Tensioner/Belt/3 Pullys
Image


Tools for the job
Wheel Brace / Trolly Jack / Axel Stand / Wood.
Sockets
8mm/10mm/13mm/15mm/18mm + Extender Bars
Spanners
13mm/15mm
Torq's Bits
T40 and 10mm allen Key

1 loosen the wheel nuts then jack up the car so the wheel is off the ground and support the car with the axel stand . take off the wheel completely ...
Image


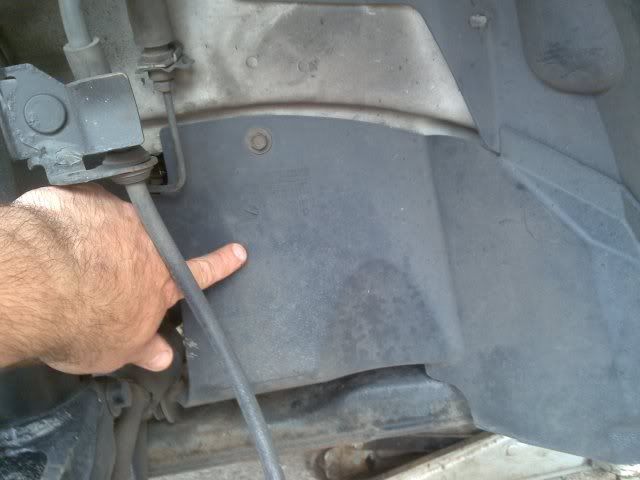
in this Picture you will see a dirt cover that needs to be removed using your 8mm & 10mm sockets remove the
Image


Now you need to jack up and Suport the engine with some wood using your trolly jack see picture
Image


Engine mount removel it would be wise to move the water header tank using 10mm socket on extender now remove engine mount using 10mm Socket for the Sound deadner 18mm for the Top Nuts and 15mm for lower Bolts See Pictures
Image

Image


Now when lowering the engine becarefull not to damage your CV Joint as it can rest on the subframe
Image


Now you can eather Pull of your belt or cut it REMEMBER how it goes on !!

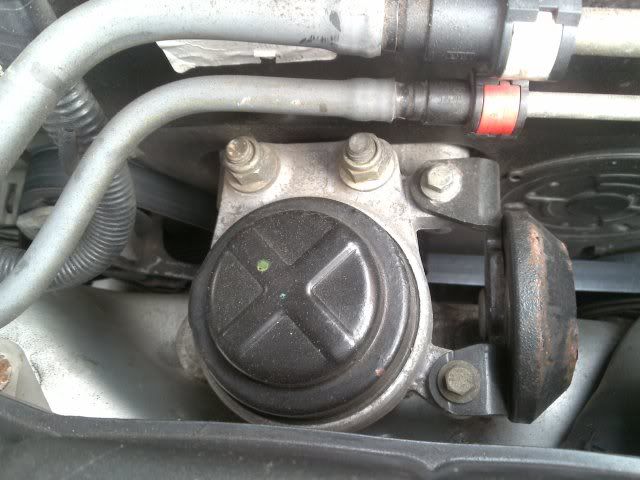
Now to remove the Tensioner you need to undo the altenator using 15mm socket on the bottem Nuts and 13mm socket on the top bolt
Image


Now comes the removel of the Belt Tensioner
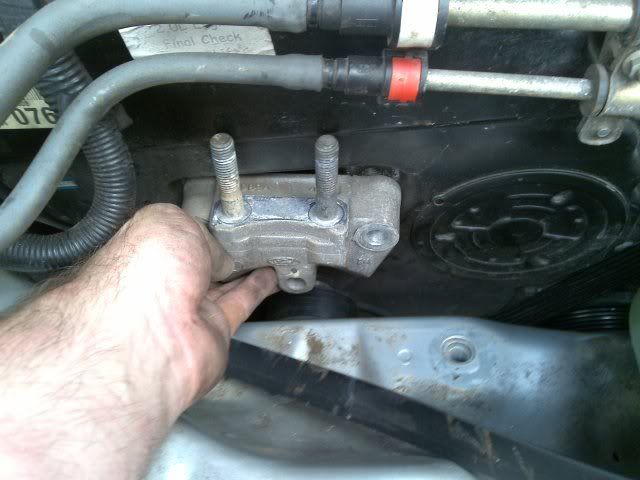
3 13mm Bolts hold the frame on 2 from under the car other at the top
Image


Getting it out is a little tricky i had to push the altenator up high from under the car and take the Tensioner out beside the exhaust pipe

Now you can Repace parts using Torqs T40 and your 10mm Allen key
Image


Removing center Pully you will have to take the remainder of the engine mount off 1x 13mm Nut 2x 18mm Bolts 1x 15mm Twin Ended Bold that holds the center pully
Image

Image


Remember when refitting that the Belt goes through the Tensioner :)

i made a little tool for releasing the tensioner so the belt can be put back on the pullys with no Fuss
i used a 13mm bolt and 2x 13mm nuts i did have to File/Grind to small flat spots so it would fit in the 1/2" hole i used a spanner to Lever
Image

Image


Hope this helps

Cheers
Mark
Thanks for the info, great advice but not sure how you moved the tensioner with just a spanner! I recently had to do mine (Mk3 TDCI) and found it impossible to lever back the tensioner, there are 2 square holes but no room to get a rachet in. I made a tool using just one hole but hardly moved and was wary it could break the casting. The official tool uses 2 pegs on a long lever and thats what I fabricated - even then was tough - those poor pulleys must be under lots of pressure!
 
As above; if you have an impact gun, use it to undo the three bolts on the crank shaft pulley. Suddenly, with no effort, the belt is loose.
To re-tension, put one bolt through the pulley and into the hole at around the 1:00 o'clock position. Feed the belt onto all the pulleys and then, using your hands, spin the crankshaft pulley clockwise around the one bolt until the other three holes line up. Given how much tension is applied by the tensioner, turning the crankshaft pulley is surprisingly easy.

Here isa how to do it!!! It's brilliant.

 
Clever indeed! Ok if you have the impact gun to undo the crank bolts, else you risk turning engine backwards, I suppose...
 
What a bloody nightmare!!!!! Have spent too long looking for an INA 535022310 and final found one at a reasonable price of £59. But so many Google searches product Out of Stock / No Longer in Production / We don't post to the UK.

The people I found then asked for my VIN, which on a Mk3, will say this part is not available. I contacted them to explain and today, another contact, saying the part they are advertising is not available.

And trying to find one that is compatible is impossible as it seems the pulley diameter and the distance to the first groove are the important measurements, and most sites do not provide that info.

Then there are the X thousand pulleys for X gazillion car models. Downloaded the INA catalogue and that runs to 52 pages of pulley numbers / car models. Definitely confusion reins!

How did it all become so complex???
 
But the price is figured out on the rpm of the bearing. The longer you have it, the greater the number of revs and hence, the lower the price per rev.

I think there is a post on this thread regarding lowering the cost by pressing out the bearing and pressing a new one into the plastic pulley. I bought a bearing to try that; seems like a good idea. I don't have a press, but jury-rigged a large bolt and washers to wind the bearing out. Didn't work. The pulley has a small 'flange' to hold the bearing in place. My guess is that when new, the plastic has a bit of give, or it is heated to press the bearing in place. Over the years, the pulley plastic most likely becomes brittle, and all I managed to do was break the pulley. Now I have a spare (new and unwanted) bearing.
 
  • Like
Reactions: Grisleigh
401 - 419 of 419 Posts